Dream...
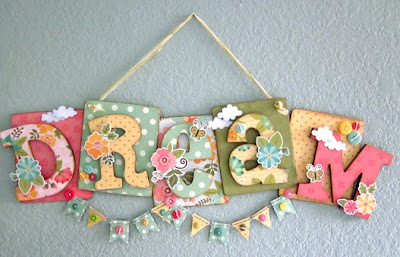
My November project is up at the My Little Shoebox blog today! I used the Enchanted Garden line and I gotta tell you, this line is just so dang pretty your projects will practically make themselves! Mine did!!
Wouldn't this ever be cute for a little girl's bedroom??
I bought the thin wood rectangle pieces from Hobby Lobby and the letters themselves from Michaels. The papers are all Mod Podged (pretty sure you can make Mod Podge a verb) onto the wood and allowed to dry overnight. After I trimmed around the edges, I filed the edges with a piece of sandpaper, and then chalk inked the edges of the paper, and painted (with thinned down paint) the edges of the wood. To make sure the letters stayed on the wood squares and that the wood squares all stayed nice and fixed to each other, I used wood glue - Liquid Nails. The flowers are all from the sticker sheet, pop dotted and baby powdered so they won't stick to anything else, and the clouds and the banner pieces are all from the die cut sheet. And the buttons are a miscellaneous assortment I found in my stash. Oh yeah, and I used the Crop-a-Dile to punch the holes for the ribbon that is poked through and knotted.


That is really sweet! Love it!
ReplyDeletewhat a lovely hanging lots of lovely details as well
ReplyDeletehugs
Oh, so cute!!
ReplyDelete